makeup by anne bismonte

makeup by anne bismonte
Showing posts with label Makeup Artist Kit. Show all posts

Thursday, October 08, 2015

REVIEW: Hourglass Ambient Lighting Palette


This palette launched 2 years back I think during the holiday season and it is one of the most coveted / hyped-up products of 2013. It is meant to be a limited edition from Hourglass but it is now part of their permanent collection because Hourglass got a huge volume of demand out of this palette.


It took me years to finally decide getting this palette I have so many highlighters (one of my obsessions) and I am really curious how these powders work.  It is supposed to be a limited edition palette from hourglass but now it is already part of their permanent collection, you know me I do pass on limited edition product (okay sometimes I don’t but most of times I do) . Now the question is, is it worth the money? 


This palette is a trio of their ambient lighting powders but a tad bit smaller than the regular ones. It has DIM LIGHT, INCANDESCENT LIGHT, and RADIANT LIGHT. 


The palette has 0.116 oz/ 3.3 g (x3) amount of product while the full size individual powders has 0.35 oz.  The shades dim light and radiant light you can buy them in full sizes while the incandescent light is only exclusive to this palette. This palette cost $58 in Sephora website, the individual powder cost $45 and the travel size individual powder cost $22. I paid Php 3,500.00 for this palette and that is after taxes and the shipping rate is already included. If you come to think of it the palette is already a deal for its price since the full size cost Php 2,100.00 here in the Philippines (after taxes and shipping rate included).  

Packaging is very elegant looking and has luxurious feels in it. It is a mirrored type of packaging that gets finger prints in it but that doesn’t really bother me and I actually prefer that because it’s easier for me to clean compared to a rubberized type of packaging that can get messy after a while (i.e. NARS and LORAC PRO packaging). It is really perfect for travel and you get a decent size of mirror which I think is pretty useful. 


These powders are meant to be highlighters according to Hourglass but I don’t want to call all of them highlighters since most of the shades are skin-toned and can be used as a setting powder. It sounds scary to me when they say, “It’s a highlighter that you can dust all over your face” or “A highlighter use to set your foundation”. *insert silly face here* Like really? I’m thinking of a Disco ball right now.

I’d like to call them finishing powders with a very subtle sheen – really subtle that you can’t even notice a difference but when the light hit your face you’ll get that multi-dimensional luminescence glow. None of these powders are frosted or glittery, if you want some highlight on point these powders might give you that but which extra effort like you have to wet the brush and build the powders on your face. This is not even close to a BECCA  SHIMMERING SKIN PERFECTOR which for me is the Goddess of all highlighters.

Let's take a look on each shades.


DIM LIGHT - It is described as a neutral peach beige powder that blurs imperfections and highlights a radiant complexion with the perfect balance of warm and cool tones. I think the effect will vary depending on your skin tone. I’d like to use this powder as finishing powder by lightly dusting it all over my face right after setting my foundation. It is my favourite shade in this palette.


INCANDESCENT LIGHT – According to hourglass it is an opalescent pearl powder that brightens the complexion with a celestial glow. To me it is a straight-up highlighter that I use to give me some “dewy-ness” I use this above my cheek bones, tip of the nose and cupids bow. The shade is very similar to MAC soft and gentle  which I really love  but Incandescent light has this subtle sheen that you wont be able to see the shiny bits on your skin compared to mac that has chunky glitters in it. So if I love soft and gentle, I love love love Incandescent light because of its subtle-ness. We want everything natural don’t we? 


RADIANT LIGHT – Described as sun-kissed golden beige that enhances the overall complexion with believable, subtle warmth, and also extends a summer glow. In short it is a light bronzer and I seldom use it. I think it is not warm enough to be a bronzer and I barely see it on my fair to medium skin. 


HOW TO USE:
1. Dust Dim Light all over your complexion.
2. Add Radiant Light as your light bronzer or on top of your usual bronzer.
3. Finish off by applying Incandescent Light on the tops of the cheekbones, under the brow bone, the tip the nose and your cupid’s bow to brighten the whole look.
*Results will be dramatically different if you have different skin-tone. 

SWATCHES: 


(L-R) DIM LIGHT, INCANDESCENT LIGHT, RADIANT LIGHT

I would like to say that I really love this palette; I’m enjoying it so far. I’ve been using it exactly 1 month and 2 weeks now from the day that I got it and I can really see the difference of it to other highlighters however BECCA OPAL is still my top 1 favorite highlighter because mama loves highlight on fleeeeek.

Going back to the question, is it worth the money? Well, if you're looking for a versatile palette, then this is a good buy for you. It expensive but the quality you pay for is definitely there. For me it is a must try, but if you have a huge stash of highlighters and bronzers it is not a must have. If you get what I mean. 


What are your thoughts about this lovely Hourglass Palette? Share it below. 


With Love,
Anne

Wednesday, September 09, 2015

REVIEW: MAKEUP FOREVER HD FOUNDATION + Giveaway Winner!


Hey there beauty! Ya’ll know what the drill is; today’s beauty insider is about the cult favourite, the MAKEUP FORVER HD FOUNDATION. It is the most raved and hyped foundation of all times. I’ve had it for quite sometime now, I think it’s been almost 7 months since the 1st time I used this foundation, I know that’s a pretty long time for drive testing a foundation, can't even remember how it felt the 1st time I use it. And because I have so much experience with this product and I have been working with it for several months with different types of skin, I am really familiar how it works in any skin types.

Before we start I just want to say that this is the original formulation of MAKEUP FOREVER. I know they released a new formula for their HD line which is the ULTRA HD FOUNDATION. Okay, 1st of all, I don’t see myself purchasing the ULTRA HD, maybe because I have a bunch of colours/shades from the original formulation and if that happens we’re talking about waste of money here, we all know they’re expensive. Second,  I think, in my own opinion, putting the word “ULTRA” to their new line means that we should expect a lot better from the original formulation. The original formulation from MAKEUP FOREVER is one of the best formulas of a foundation that I have ever tried, so introducing the ULTRA HD, to me sounds like a gimmick. You know what I’m saying? Well, that is just my two cents, so if ever you don’t have the original formulation go ahead and try the ULTRA HD girlfriend because they say it is a better formula.

Okay, going back.

I know there is a lot of controversy about this foundation – some really likes it – some don’t. Product is getting mixed reviews from different types of people, with different skin types with or without experience in makeup. Which is contradicting when it comes to a foundation and you start to think “is it really a must have” or “will this foundation work great on me?” 


As a freelance makeup artist, I love the fact that I can choose any brand that I wanted to try and include in my kit and it’s great to have a brand preference, a brand that you could trust, a brand that is being tried and tested, and one of them is MAKEUP FOREVER. I bought 5 shades of MUFE HD FOUNDATION mainly because I use them for my freelancing kit and for myself as well.


The word HD or high-definition, in the world of cameras HD means higher resolution and quality, while in the world of makeup HD means natural quality of makeup. HD line of makeup is built mainly for films and photography but since we live in an era where #selfies and #MOTDs (makeup of the day) are the norm everyone is using this foundation. As the world of Cameras evolves, makeup is stepping up its game too. High-definition cameras expose any crease, wrinkle, or blemishes we have. So that thick and un-natural pancake makeup is also obvious through an HD camera lens. To avoid the cake-y texture of a standard or traditional TV or photography makeup, HD makeup is formed sheerer while still hiding uneven skin texture, dark spots, blemishes and other "un-telegenic flaws".  


The packaging is nothing special, it’s a plastic bottle with a black pump. I hate to say that I don’t like the durability of the packaging specially the cap. 3 out of my 5 bottle’s cap are broken because they fell off the ground. Eh? It comes with a black box and it has all the description for the foundation. It has 30 ml or 1.01 fl oz which is very standard and most foundation has. This cost 2,400 peso (mall price) not quite sure about the price now.

The makeup forever HD claims that it will blur any imperfections to give your skin a soft-focus effect. I find that this foundation has a light to medium coverage, so if you have a very problematic skin or if you have a major scarring issue this foundation is not for you. It is pigmented but it will not cover everything major, it is meant to be sheer but there is still coverage. You may try to build it to your liking but I suggest just use a concealer to hide those spots peaking through because that’s the purpose of our concealers.


Download the ZALORA APP  from the Google Playstore 


 It is true that it looks like your second skin but I find that using a flat top brush with this foundation looks like it is sitting on top of my skin. Meaning it is not adhering or blending into my skin, but whenever I use a brush that is not super dense  like the multi-task brush of RT or my favourite tool which is the beauty blender, the foundation is absolutely gorgeous. The finish of this foundation is not super matte but not luminous, I think it is more of like in between like a satin- matte finish. The foundation, in my own experience, with combination skin, can last for over 8 hours however for the last 3 hours my spots starts to peek through but I can still see the foundation covering my hyper-pigmentation.


My shade is N120 in MUFE and I am NC20-NC25 in MAC. The foundation doesn’t oxidize on my combination skin and I love that this is a water-proof formula. I remember during the summer months I had a photo shoot wherein my model have to submerge in a pool. I used this foundation and it doesn’t move, budge or rubbed off.  The formula has a fluid type of texture and it is really blendable when you use the right tool. If applied properly, the skin feels smooth and moisturized and it doesn’t feel heavy or cake-y at all. The formula catches light and has a satin finish which I find that resembles natural skin. I find that this foundation looks great on a natural to dry skin. If you are combination to oily skin you should prep your skin really well and use a mattifying primer before applying this foundation. 

I have tried this foundation to a lot of people that I have worked with whether its for photo-shoot, bridal, even on mature skin and none of them -- even I did not experienced any itchiness or any skin irritation or breakouts with this foundation. This foundation is high maintenance. It is not the type of foundation that you’ll just slap on your face and that’s it. What I mean is, it’s a type of foundation that you have to properly prep your skin and apply it properly to get the full HD effect.  


Let me show you a photo of mine wearing this foundation alone.

As you can see on my before photo (left) I have dark spots on my cheeks, redness all over my face, dark circles and my skin is not even toned. After putting 2 layers of MUFE HD in 120, I have an even skintone but you can still see some of my spots peeking through. 

Over all I love this foundation.  It is truly amazing on its own and for me it is a kit staple and a must have! Hope this review helps those who are still pondering to purchase the product. Tell me if you like this product and what is your all time go to liquid foundation at the down box. Till my next post girlfriend! 


Thank you to all those who entered to my giveaway with @suzannesemporium! THE GIVEAWAY WINNER IS ............... 

@vanitybykristine

Please send me a message at makeupbyannebismonte@gmail.com If I didn't get any message within 24 hours we will choose another winner via random.org

With Love,
Anne

Friday, August 28, 2015

HOW TO: Highlight 101 (on FLEEEEEEEK!)


Hey there beauties! Okay, get yourselves together because we’re going to talk about those highlights on fleeeeeeeeeek. Highlighting is one of my favourite steps whenever I am doing my makeup because it can instantly lift your face and get rid of those tired looking eyes, it can make your face glow and dewy and youthful. Tell me, who doesn’t like glowing and youthful skin?

Highlighting is great when it is done correctly and when it is placed where it should be. It can be a little tricky but when you find the right shade that compliments your skin tone it could be your best friend for your everyday routine. I’m just going to talk more about highlighting and then I’m going to show you some of the products that I do recommend for highlighting purposes. 

During my makeup workshops, everyone gets crazy whenever we reached the highlighting topic. Because come on’ we all know that 2015 is the year of contour and highlight and there is a bunch of new highlighting and contouring products out in the market and it seems like everyone is raving about them. I am more into highlighting than contouring just because I like dewy skin, I love how it freshens the face and the look of the makeup. 

Let’s talk more about Highlighting.

WHAT IS HIGHLIGHTING? Highlighting brings facial features forward so they appear larger or fuller. Highlighting products are either light reflective powders or matte powders that are 2-3 shades lighter than your skin. The shades range from bright pearly whites to matte beige shades into champagnes, gold’s and rose gold shades for deeper skin tone. 


Two forms of highlighting: Creams/liquids/matte powders that is lighter than our skin tone and light reflective powders.

Parts where we usually highlight: T-zone  - Forehead, Chin, Cupids bow, Nose bridge and under eye area (For this areas, use a concealer or cream that is 2-3 shades lighter than you skin tone or your foundation then set it with a matte finish powder to set your highlighting creams or concealers. Make sure that the powder you use corresponds to the shade of your concealer to make the highlight visible.)

Highest points of your face - Chin, top of the cheeks, brow bone, tip of the nose, top of the brow arch  (Use a light reflective powder for this part to accentuate your face and give you a dewy finish and not looking too flat. Avoid applying this kind of highlighting powder to your forehead as it can make you look oily instead of dewy. ) 

So here are the products that I do recommend for highlighting:

Light Reflective Highlighters:  (powder or liquid)

BECCA SHIMMERING SKIN-PERFECTOR IN OPAL

LAURA MERCIER MATTE RADIANCE BAKED POWDER IN 01
MAC MSF IN SOFT & GENTLE  AND IN GLOBAL GLOW


HARD CANDY BAKED BRONZER IN TIKI
HOURGLASS AMBIENT LIGHTING POWDERS

Highlighting Concealers: (My top 5 picks)


MAYBELINE INSTANT AGE REWIND DARK CIRCLE ERASER IN LIGHT 120


MAC PRO-LONGWEAR CONCEALER IN NC2O

ALMAY WAKE UP CONCEALER IN 020 LIGHT/MEDIUM

MAYBELINE FIT ME CONCEALER IN 010 LIGHT AND 020 SAND

RIMMEL LONDON WAKE ME UP CONCEALER IN IVORY
As you noticed, I have more drugstore recommendations when it comes to highlighting concealers because I find that drugstore brands, well some of them, did a really great job when it comes to their concealers and foundations. Rarely do I find a very good light reflecting highlighters on a drugstores brand, some of them are flaky and frosty and you girls should avoid that because it can be just chunks of glitters on your face. What we wanted for a highlight is a subtle sheen that will make us dewy. 

I like to use my fingers or a damp beauty blender in blending my highlighting concealers and what I like to use for setting my highlighting concealer is the BEN-NYE BANANA POWDER mixed with BEN-NYE NEUTRAL SET to make the yellow tone of the banana powder not super intense. I also like using the RIMMEL STAY MATTE POWDER or the MAC MINERALIE SKIN-FINISH NATURAL IN THE SHADE LIGHT.

Tell me if you want me to do an in-depth review on each product of highlighters that I do own. Shades that are being mention above are my own shade, you may want to check or do a research first to find your shade before purchasing the product.  I heard that Anastasia Beverly hills and Gerard Cosmetics will come up with a highlighter this coming holiday season! Who’s excited????? Mama is excitedddd of course! *snap *snap

Thank you for reading my blog and tell me what is your favourite highlighter on the comment box below! Don’t forget to subscribe to my blog and follow me on instagram at @annebismonte_mua. SEE YOU ALL SOON!


BTW, Here are some example photos for Highlighting. These photos are from my HEADWAY VERA SALON Ad-shoot. See the caption for the credits.  


MODEL: MJ MARFORI of TV5 Entertainment news Showbiz Konek
PHOTO BY: STEPHEN CAPPUCINO of Zoomburst Studio
MAKEUP BY: ANNE BISMONTE
HAIR BY: HEADWAY VERA SALON

MODEL: DESIREE DEL VALLE | TV ACTRESS of ABS-CBN
PHOTO BY: STEPHEN CAPPUCINO of Zoomburst Studio
MAKEUP BY: ANNE BISMONTE
HAIR BY: HEADWAY VERA SALON

Much Love,
Anne

Tuesday, August 04, 2015

RECENT MAKEUP HAUL!


Hi there beauties! It’s been a while since I’ve done a haul, actually I’m in a hiatus, banning myself for some shopping, but I couldn’t resist makeup. I think that shopping for makeup is therapeutic (the famous and well used reason of every beauty junkie ha-ha!).  As usual, your mama went crazy and ended up buying a lot well mainly for my “Professional Kit” and some for my own beauty bag. 

My clients are my real treasure. Especially if I do get a referral from them or repeat services because I feel and I know at some point I have done a great job for them. Why would they even refer me or hire me again if I did not? Right?  So I never really but knock offs (FAKE) for my kit, because my clients deserve premium quality makeup brands, I know because if ever I’m a client I would want that too. 

I did a quick shopping last thursday at Makeup Pro – Makati and purchased some stuff online at Beautyholic Manila. I have 4 separate orders so expect 2 haul post upcoming.

In this haul , everything I picked up are all face products because I wanted to try something new and restock some old favourites for my kit. Here are the products that I got from the Makeup Pro store and Beautyholic Manila.

    RCMA series favourites’ palette in KO


   Laura Mercier Foundation Primer (original) 


    Hourglass ambient blush in Diffused Heat 


    MAC Pro-longwear concealer in NC20 and MAC studio fix powder foundation in NC20 and NC30


I know that I’m too late about the Hourglass craze. I know, but it’s better late than never. Lol! So I made a pre-order for the other shade of Hourglass ambient blushes and the lighting powder just because I fell in love with the Diffused Heat. I think that they are perfect for weddings and other special occasions. I got the Pro-longwear for my personal beauty bag because it is my absolute favourite for my under eye. I got the 2 MAC studio fix powder foundation in NC20 and NC30 from Beautyholic Manila. I picked up the NC30 for back up because it is the most used shade in my kit. 

Plus I got some gifts from my Makeup Hub family! YEY! I got the very famous City Color Contour Effects and Look Beauty Intense color lip balm & stain Fat Lips in shade snog. Thank you Ms. Sarah! If you want to get your own check out their website at www.makeuphub.com.ph 


If you guys want to see in-depth reviews of any of these products, let me know at the comment section down below. Thank you again for reading my blog and see you again on my next post! Have you made any new beauty purchases recently?


Much Love,
Anne

Wednesday, July 22, 2015

REVIEW: Anastasia Beverly Hills Contour Kit

Hey there beauty! Finally, my first product review for the year 2015 is up. (Laughs)  I have been into my makeup gigs and workshops recently so it took me sometime to just sit down and talk about makeup and write you guys my own honest opinion about this product.

Today we’re gonna talk about my very own ANASTASIA BEVERLY HILLS CONTOUR KIT (powder). Alright so I know this product is a popular one, I’ve seen great and bad reviews about it. I had this contour kit for almost 5 months and it’s my first contour kit actually because I’m using individual shades or products from MAC and NARS for my contour shades and highlighting shades before.


When I got this kit it is pretty small and I wasn’t really expecting that. The packaging is the usual cardboard magnetic type.  Each pan has 3g of product for each shade inside the kit. You can actually create your own kit and choose the shades you wanted at Anastasia’s website. I regret getting the original kit because I seldom reach for HAVANA and SAND. 


TOP (L-F) VANILLA, BANANA, SAND
BOTTOM (L-F) JAVA, FAWN, HAVANA
As you see, you have 3 highlighting shades (VANILLA, BANANA & SAND) and 3 contour shades (JAVA, FAWN & HAVANA).  All these shades are matte except SAND, which is actually a beautiful shimmery highlighter. 

Let’s take a closer look to all contour shades first.

(L-F) JAVA, FAWN, HAVANA


Fawn is a medium taupe; and it’s the best contour shade in my opinion.

Java is more warm than fawn. It has a little reddish kind of tone to it compare to fawn. I like to use Java as a bronzing powder.

Havana is the warmest contour shade of all three. This is the only shade I don't like and I seldom use, because it appears to be too orange when applied to the skin. 

(L-F) VANILLA, BANANA, SAND


Vanilla is a pink under-toned matte highlighter. You can use it to set and brighten your under eye, forehead, chin, and your nose bridge (commonly know as T-zone).

Banana is a yellow under-toned matte highlighter. You may also use this to set your under eye concealer and brighten the areas you'd like to be highlighted.

Sand is a shimmery highlighter with a very light pinky shimmer and as you can see it barely show off to my medium fair skin. You can use this to give you the "glowing" look by placing it on the high points of your face such as the cheekbones, brow bone, bridge of the nose, and your cupids bow.


Overall I think the palette is worth the money and really perfect for a Professional Makeup Artist, just replace the Havana shade with another taupe-y contour shade and the palette is good to go. 

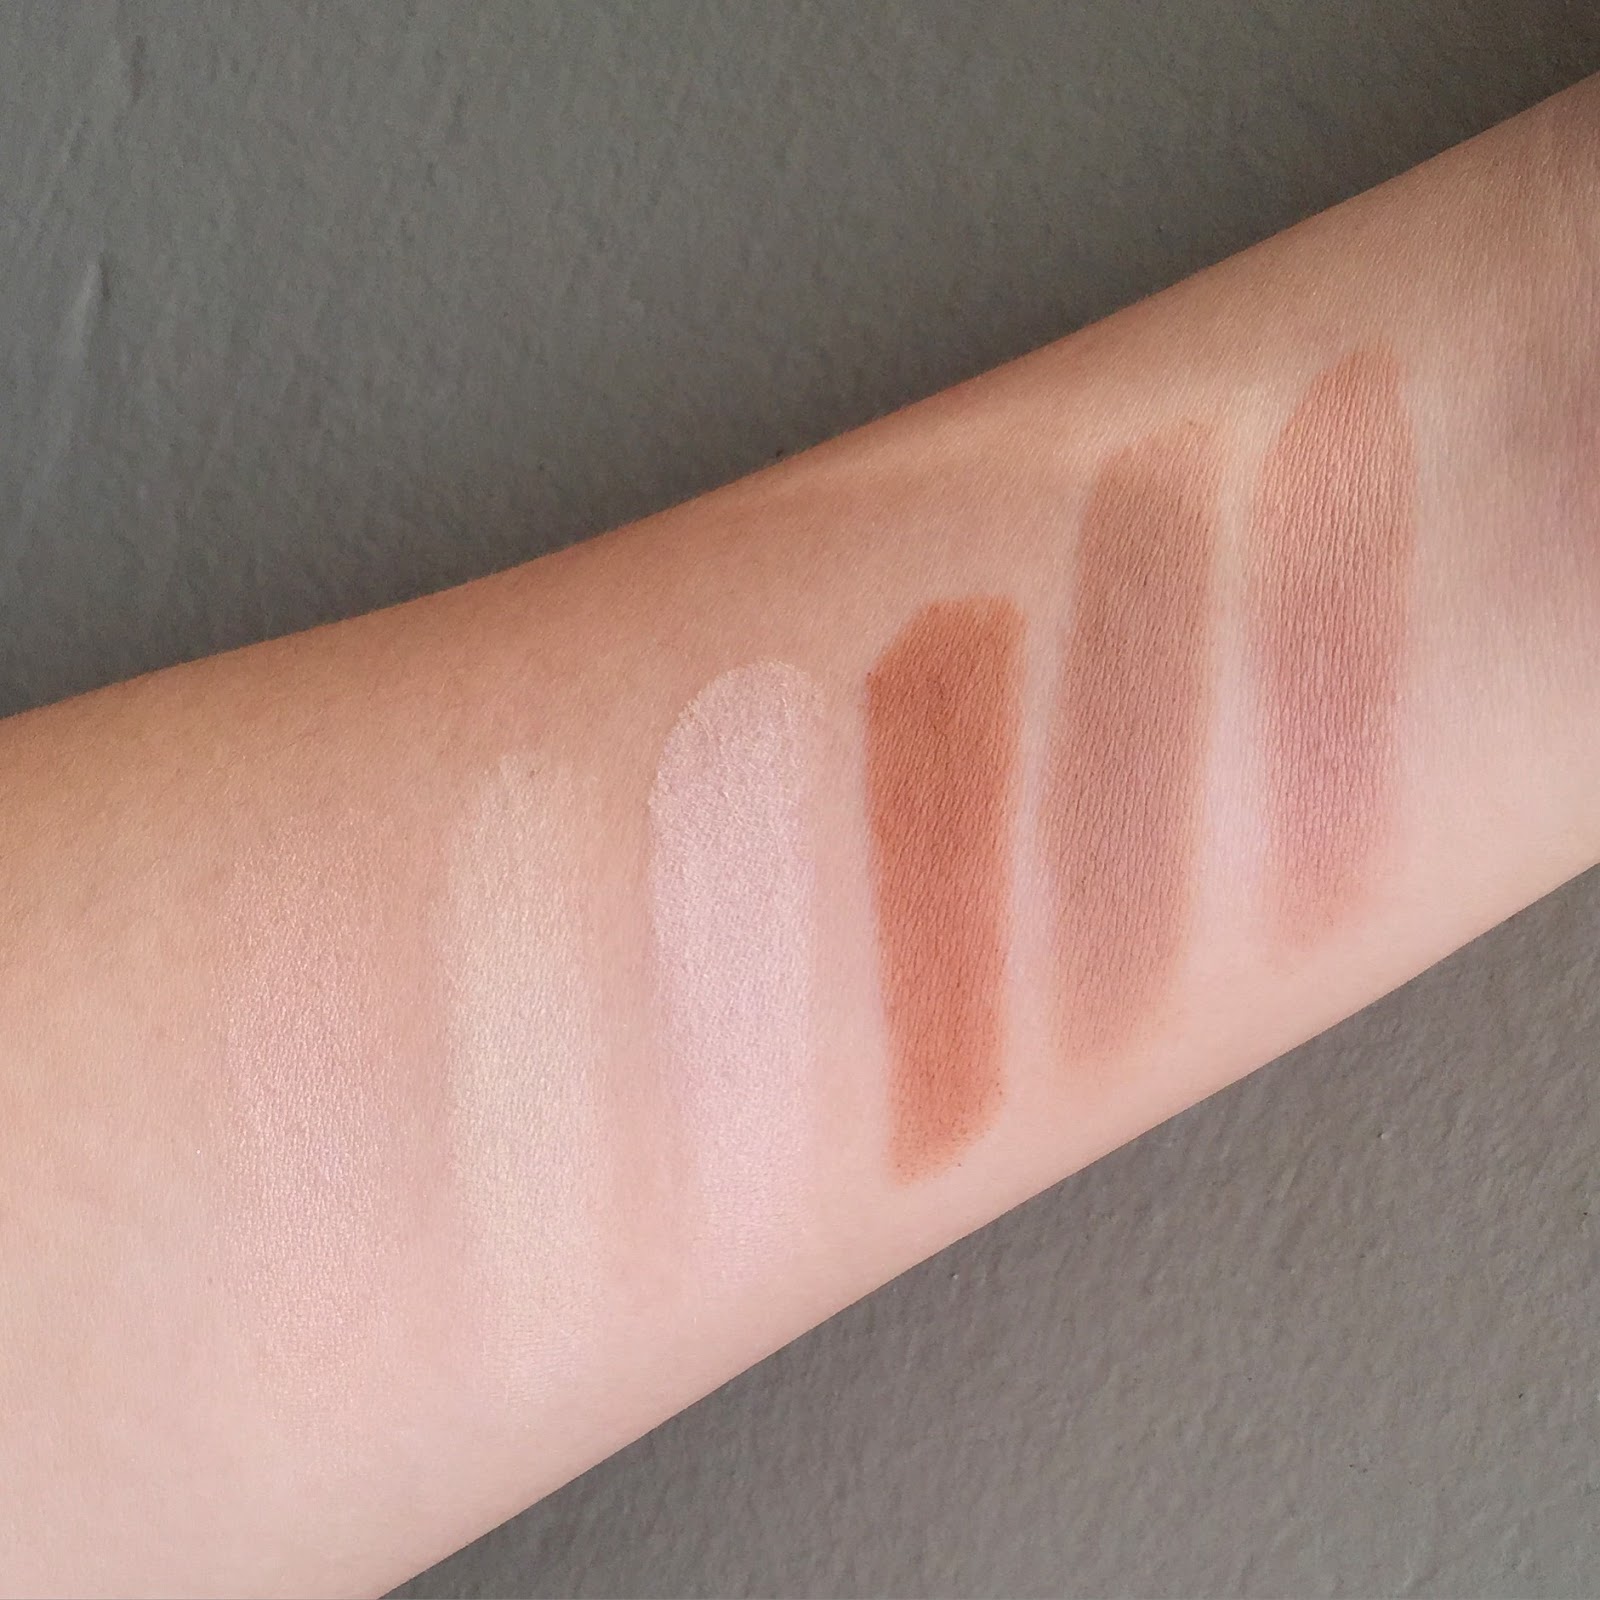
(L-R) SAND, BANANA, VANILLA, HAVANA, FAWN, JAVA

I’m recently looking for another contour kit and I’m torn between KVD shade and light palette or the NEW LORAC PRO contour kit? Help me decide at the comment section below! 

I hope you find this post helpful (which I know there’s a ton of reviews out there) tell me what do you think about ABH products? What are your faves from ABH?

Hope you had a very wonderful day!


Much Love,
Anne